
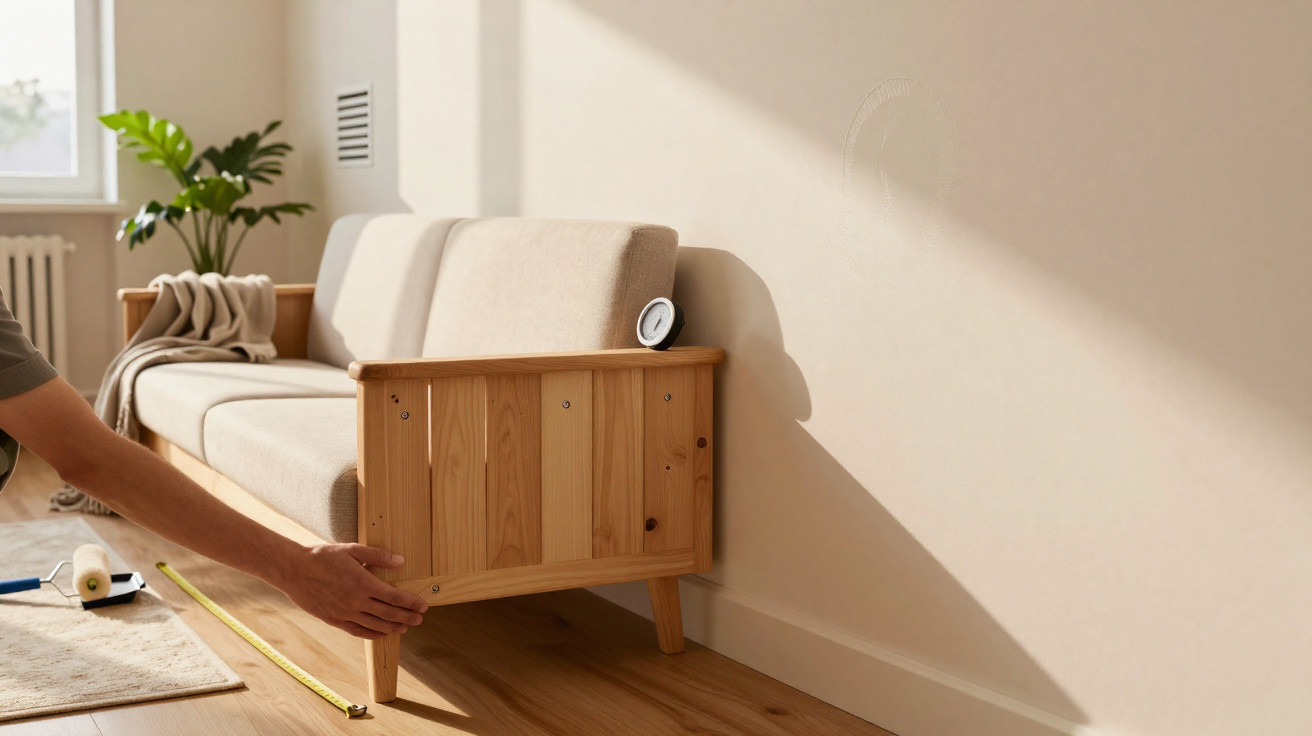
In brief
- Creating a modest clearance (30–60 mm) behind furniture encourages airflow, breaks up the “boundary layer”, and helps keep wall surfaces above the dew point, reducing the chance of condensation marks.
- Practical starting points: allow 30–50 mm behind sofas and 60–100 mm behind wardrobes on external walls; use spacers or felt pads and avoid cramming units so the air channel stays open.
- Evidence from real homes: a Manchester case study found that a 40–60 mm gap increased wall surface temperature by around 1–2°C at the most critical times, stopping nightly wetting and preventing mould staining.
- Spacing works best alongside steady low-level heating, effective ventilation (extract fans meeting Part F and trickle vents), plus breathable paints to help keep RH at 40–60%.
- Balancing benefits and drawbacks: wider gaps improve drying and make cleaning easier, but they do take up floor space; track conditions with an inexpensive hygrometer and adjust the layout around cold spots and thermal bridges.
Those pale, ghost-like rectangles that appear behind a sofa or wardrobe are not a trick of the light. They are condensation marks: uneven, sometimes sooty-looking patches that form when still air lets moisture settle on a colder section of wall. Across the UK’s mix of homes-solid-walled Victorian terraces through to tightly sealed new-builds-this slow, hidden build-up can lead to mould, lingering smells and failing paintwork. One of the most straightforward remedies is simply to pull furniture slightly away from the wall so air can move. That narrow slot sets up a small convective loop, evens out surface temperatures and helps keep the wall above the dew point. It is inexpensive, often avoids repeat decorating, protects plaster and can improve indoor air quality-especially during a damp British winter.
The Physics: Why Airflow Stops Condensation Marks
Condensation happens when warm, moisture-laden indoor air hits a cooler surface and can no longer hold all its water vapour. Large items of furniture can make the wall behind them colder because they block warmth from the room and trap a still “boundary layer” of air. When the air is stagnant, there is less heat transfer, the surface cools, and the dew point is easier to reach. Move a tall unit just 30–60 mm out and the conditions change: a slim vertical channel forms where airflow can circulate and gently warm the wall.
It is essentially a small-scale “microclimate” correction. The gap allows a quiet but continuous convection cycle: cooler air enters near the floor, rises up the back as it warms against the wall and furniture, then escapes at the top. With the wall surface held closer to the room temperature, moisture is less likely to condense. In practical terms, that usually means fewer tide marks, less chance of mould spores taking hold, and paint finishes that last longer.
- Dew point: the temperature at which moisture in the air turns into liquid on a surface. You avoid it by warming the wall surface or reducing humidity.
- Boundary layer: a thin, stagnant zone of air. Introducing airflow breaks it up and reduces condensation.
- Thermal bridges: localised cold areas (such as external corners); spacing helps moderate these too.
Even minor spacing adjustments can keep surfaces above dew point for several hours a day-which matters because staining and mould growth most often occur overnight and on cold mornings.
How Far Is “Slightly”? Practical Distances, Layouts, and Materials
The best clearance varies with construction type, the room’s humidity levels and the depth of the furniture. As a practical baseline, try 30–50 mm behind sofas, and 60–100 mm behind deep, full-height wardrobes when they sit on external walls. Although even 20 mm is an improvement over placing furniture flush, extra space gives a bigger safety buffer. Spacer blocks or felt pads help maintain a consistent channel, and keeping wardrobes slightly under-filled makes it easier for air to move along the back and underneath.
| Wall Type | Condensation Risk | Recommended Gap | Notes |
|---|---|---|---|
| Solid brick/stone (uninsulated) | High | 50–80 mm | Coldest in winter; consider breathable paint and using trickle vents. |
| Cavity wall (uninsulated cavity) | Medium | 40–60 mm | Keep an eye on external corners and north-facing façades. |
| Insulated (internal or external) | Lower | 30–50 mm | Gaps still help at bridging points and behind tall units. |
| Timber frame | Variable | 40–60 mm | Make sure vapour control layers are not compromised. |
Pros and cons of increasing the gap:
- Pros: stronger airflow, warmer surfaces, fewer condensation marks, simpler cleaning.
- Cons: loss of usable space, more visible gaps for cables, and a higher risk of tipping if tall furniture is not secured.
Pushing furniture right against the wall is not the “neatest” option in building-physics terms: it cools the surface, traps humidity and concentrates dust that can “print” as grey marks. Aim for both top and bottom clearance, do not seal the back with foam, and avoid positioning items so close to radiators that warm air is driven behind units and loads that space with moisture.
UK Case Study and Fresh Data: Hidden Damp in Real Homes
In a Manchester semi with a north-facing solid brick wall, a family spotted a dark outline matching the shape of their 2 m wardrobe. A simple three-week check using a £12 hygrometer and a surface thermometer made the cause clear. Week 1 (wardrobe flush to the wall): the room sat at 20°C and 63% RH; at dawn the wall behind the wardrobe averaged 14.8°C-below the 15.1°C dew point-so condensation formed most nights and left sooty streaks. Week 2 (40 mm gap): the wall temperature increased to 15.7–16.2°C; there was no visible wetting and dust build-up reduced. Week 3 (60 mm gap plus a 5 mm under-plinth slot): the wall reached 16.8–17.1°C; the staining stopped worsening and dried back after gentle cleaning.
The pattern echoed findings about boundary-layer disruption: a narrow, consistent air channel can lift surface temperature by 1–2°C at the key hours. For many homes, that small change is the line between damp and dry. The family left the wardrobe slightly under-filled, fitted unobtrusive spacers, and set their bathroom fan to run on for 20 minutes after showers to reduce the daily moisture load. After six months there were no new marks and the home smelled fresher. It is not complicated engineering-just basic physics using everyday tools.
Beyond Gaps: Ventilation, Heating, and Paint That Help
Leaving space is an excellent first step, but lasting results typically come from combining ventilation, stable warmth and vapour-friendly finishes. Bedrooms and living rooms often benefit from trickle vents or planned window opening, while kitchens and bathrooms should have extractor fans that meet or exceed Part F guidance. Aim to keep indoor relative humidity around 40–60%; in winter, a small dehumidifier can be particularly useful in well-sealed flats.
Heating strategy also matters. Low, steady background heat generally performs better than big swings: it keeps wall temperatures more consistent and reduces the risk of dropping below the dew point overnight. On cold external walls, choose breathable paints, steer clear of vinyl wall coverings that trap moisture, and consider thermal lining paper where insulation upgrades are not realistic. If you use cable tidies at skirting level, pick options that do not obstruct the airflow route behind furniture.
- Put hygrometers in rooms most at risk; note morning RH and surface temperatures.
- Raise furniture slightly off carpets with sturdy pads to create an inlet at floor level.
- Wash existing marks using a mild detergent; keep biocides for confirmed mould.
- Tackle moisture sources such as drying clothes indoors, unvented tumble dryers or fish tanks.
Pulling furniture a hand’s breadth away from the wall may not feel like an interior design upgrade, yet it allows warm air to do continuous, quiet work-levelling temperatures, depriving mould of the conditions it needs and helping paint stay sound. Within a week or two, many homes notice fewer smudges and less mustiness, particularly on cold external walls and shaded corners. Add consistent habits-use extractor fans, maintain steady heating, and stick with breathable finishes-and you have a robust, low-cost defence. Which item will you move first, and what simple measurements could you take this week to prove the change in your own home?



Comments
No comments yet. Be the first to comment!
Leave a Comment